T-Shirt Printing
How Many Shirts Should You Order for an Event? (Simple Quantity Formula + Size Breakdown)
01/16/2026
Ordering event shirts sounds easy until you’re staring at the question every organizer hits:
How many shirts should we order?
Order too few and you run out early (which feels terrible when people are excited). Order too many and you’re sitting on boxes of leftover sizes—usually mediums and XXL—taking up storage and eating your budget.
The good news: you don’t need a complicated spreadsheet to get this right. You need:
- a realistic attendance estimate
- a simple “participation/conversion” assumption
- a buffer for staff, VIPs, and surprises
- a size breakdown that matches your crowd
This guide gives you a straightforward formula you can use in minutes, plus examples for races, fundraisers, school events, conventions, employee events, and giveaways.
Step 1: Decide What Kind of “Event Shirt” This Is
Before we touch numbers, clarify what you’re printing, because the math changes depending on purpose.
A) Staff shirts (everyone working the event needs one)
These are for volunteers, staff, security, setup crew—people who need to be identifiable.
The quantity is predictable: count staff, add a few extras.
B) Included shirt (everyone registered/paid gets one)
Common for races and ticketed events (“shirt included with registration”).
Here, your quantity closely follows registrations.
C) Optional purchase merch (people buy it at the event)
This is like a merch table. Quantity depends on “conversion rate” (what % buys).
D) Giveaway shirts (free while supplies last)
This depends on how many you want to give away and how fast you want them to disappear.
You can use the same formula for all of these, but you’ll plug in different assumptions.
The Simple Quantity Formula (Works for Most Events)
Here’s the formula you can use as a baseline:
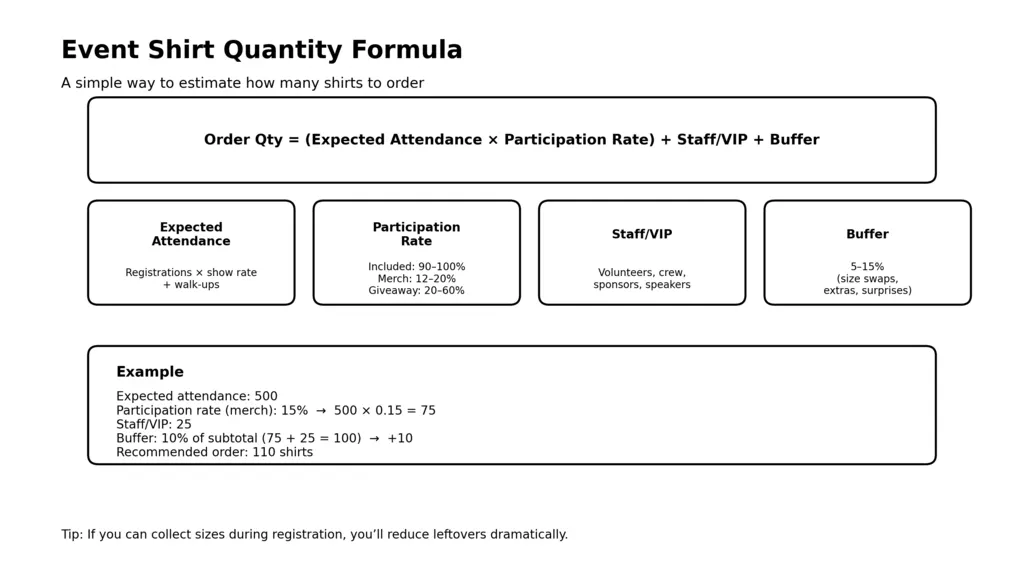
Event Shirt Quantity = (Expected Attendance × Participation Rate) + Staff/VIP + Buffer
Where:
- Expected Attendance = how many people will actually show up
- Participation Rate = the % of attendees who will receive/buy a shirt
- Staff/VIP = shirts reserved for team members, sponsors, speakers, etc.
- Buffer = extra for last-minute additions, misprints, size swaps, and surprises
Let’s break each part down.
Step 2: Estimate Expected Attendance (Not “Registrations”)
If your event has registrations/tickets, you might be tempted to use that number. But most events have no-shows, and some have walk-ups.
Use a realistic “show rate.”
Typical show rates (general guide)
- Ticketed conference / convention: 70%–90% attendance
- Community event / free event: 40%–70% (depends heavily on promotion and weather)
- Race or paid registration event: 75%–95%
- Company event: 80%–95%
If you have a strong pre-registration system and reminders, show rate goes up. If it’s free and casual, show rate is usually lower.
Expected Attendance = Registrations × Show Rate + Walk-ups
Example:
- 500 registrations, 85% show rate = 425 expected attendees
- plus 30 walk-ups = 455 expected attendance
Step 3: Choose a Participation Rate (The “Conversion Rate”)
Participation rate means: what percentage of attendees will end up with a shirt?
Use these guidelines:
If the shirt is included (race, registration package)
Participation rate is usually 90%–100%
Because most registrants expect the shirt.
If the shirt is optional merch for purchase
Typical conversion rate varies a lot:
- Conservative: 8%–12%
- Average: 12%–20%
- Great merch fit / strong design / right price: 20%–35%
- Highly niche premium merch: could be lower
If the shirt is a giveaway (free)
Participation rate depends on how aggressively you give them away:
- Low intensity giveaway: 10%–20%
- Active giveaway (“everyone gets one!”): 30%–60%
- Included in bag at entry: 60%–90%
If it’s staff shirts only
Participation rate isn’t needed—just count staff + extras.
Step 4: Add Staff, VIP, Sponsors, and Speakers (Don’t Forget This)
This is where a lot of people get burned. They order based on attendees and forget:
- staff and volunteers
- sponsors and VIPs
- speakers, presenters, and booth reps
- logistics crew (setup/breakdown)
- media / photographers
- partner organizations
A simple way to handle it:
Staff/VIP Quantity = Staff Count + (VIP/Sponsor Count) + Extras
Extras recommendation: add 5% of staff (minimum 3–5) for replacements and last-minute additions.
Step 5: Add a Buffer (This Saves You)
Even in perfect production, you’ll have:
- last-minute registrations
- walk-ups
- size swaps (“can I trade this L for an XL?”)
- occasional damaged shirt (rare, but it happens)
- a handful kept for future marketing, contest prizes, or staff backups
Buffer guideline
- For small events (under 100): +10%–15%
- For medium (100–500): +8%–12%
- For large (500+): +5%–10%
If the event is high stakes (photos, sponsors, media), go slightly higher.
Quick Examples Using the Formula
Example 1: 200-person fundraiser, shirts optional purchase
- Expected attendance: 200
- Participation rate: 15% buy a shirt
- Staff/VIP: 20 staff + 10 VIPs = 30
- Buffer: 10%
Quantity:
- Attendance shirts: 200 × 0.15 = 30
- Staff/VIP: 30
- Subtotal: 60
- Buffer 10%: +6
✅ Order ~66 shirts (round to 72 if you want clean case packs)
Example 2: 500 registered 5K race, shirts included
- Registrations: 500
- Show rate: 90% → expected attendance 450
- Participation: 100% included
- Staff: 40
- Buffer: 8%
Quantity:
- Participant shirts: 450
- Staff: 40
- Subtotal: 490
- Buffer 8%: +39
✅ Order ~529 shirts (round to 540 or 550 for clean counts)
Example 3: Free community event expecting 800 attendees, giveaway while supplies last
- Expected attendance: 800
- Giveaway intensity: moderate (20%)
- Staff/VIP: 30
- Buffer: 10%
Quantity:
- Giveaway shirts: 800 × 0.20 = 160
- Staff/VIP: 30
- Subtotal: 190
- Buffer 10%: +19
✅ Order ~209 shirts (round to 216)
The “Simple Quantity Formula” (One-Line Version)
If you want the fastest version:
Order Quantity = (Attendance × 0.15) + Staff + 10% buffer
That’s a good default for many optional-purchase or moderate giveaway events.
Then adjust:
- higher conversion if strong merch + good design
- higher show rate if paid registration
- higher buffer if high-stakes
Size Breakdown: The Part That Really Matters
Most event leftovers come from size mistakes, not quantity mistakes.
A good size breakdown depends on your audience:
- adult vs youth
- male vs female cuts
- athletic crowd vs general public
- region and demographics
- whether it’s fitted or unisex
Below are starting points for unisex adult tees.
Standard adult unisex size breakdown (general events)
- S: 10%
- M: 25%
- L: 30%
- XL: 20%
- 2XL: 10%
- 3XL: 4%
- 4XL: 1%
- 5XL: 0%–1% (only if requested)
This works well for general crowds.
Athletic event (5K/10K, fitness crowd)
- S: 12%
- M: 30%
- L: 28%
- XL: 18%
- 2XL: 8%
- 3XL+: 4% total
Construction/trades/blue-collar workforce event
- S: 5%
- M: 18%
- L: 28%
- XL: 25%
- 2XL: 15%
- 3XL: 7%
- 4XL+: 2%
School family event (more variety)
If adults and teens are mixed, you may want to include youth sizes too.
Youth Sizes: When to Include Them (and How Many)
If your event includes kids, don’t guess—ask if possible. But if you must estimate:
Simple youth add-on rule
If kids are expected to be a meaningful portion, allocate 10%–25% of total shirts to youth sizes.
Common youth breakdown (if you include youth)
- YS: 20%
- YM: 35%
- YL: 35%
- YXL: 10%
If you include youth, you’ll often reduce adult smalls slightly.
Avoiding Leftovers: Two Smart Strategies
Strategy 1: Pre-collect sizes (best)
For ticketed or registration events, collecting sizes up front makes your order far more accurate.
Even a simple form works:
- size selection required at registration
- one “size change deadline” to lock production
- tell people sizes aren’t guaranteed after the deadline
Strategy 2: Tier your order (best for merch sales)
If shirts are optional purchase, you can reduce risk by:
- printing a “core” amount pre-event
- planning a quick restock run if sales are strong
This works especially well when you use methods that can be replenished quickly—but even screen printing can be planned for restocks if you schedule properly.
Pricing and Conversion: How Shirt Price Affects Quantity
If you’re selling shirts, your price affects conversion rate.
General guidance:
- Lower price = higher conversion
- Higher price = lower conversion, but higher revenue per sale
For most community events, a mid-range price tends to be the sweet spot.
Practical conversion drivers
Your conversion rate goes up when:
- the design is legitimately cool (people would wear it after the event)
- the garment quality is good (soft, modern fit)
- the shirt feels limited (“event-only edition”)
- the display is attractive and visible
- you accept easy payments (card/tap-to-pay)
- staff actively mention the shirt
Your conversion rate goes down when:
- the design is generic
- the shirt fits poorly
- the print feels cheap or too large/uncomfortable
- the merch table is hidden
- sizing is a mess
Event Type Playbook: What to Order and Why
Fundraisers & charities
Usually a mix of:
- staff/volunteer shirts (must-have)
- optional merch (nice-to-have)
Good default:
- Estimate attendance
- Use 12%–18% conversion
- Add 10% buffer
- Add staff separately
Races (5K/10K/half)
Often shirts are included, so:
- Use registrations × show rate
- Participation ~100%
- Add staff
- Buffer 8%–12%
Corporate events
Often:
- included shirts for employees or departments
- fewer walk-ups, higher show rate
- Good default:
- count attendees directly
- add 5%–10% buffer
- size breakdown depends on workforce
Conventions / trade shows
Depends on whether shirts are:
- staff uniform
- giveaway
- merch
If it’s a booth giveaway:
- use 10%–25% participation depending on traffic and goals
- keep sizes simple (more L/XL)
- staff shirts separate
How to Handle Multiple Shirt Styles (Unisex + Women’s + Youth)
Offering multiple cuts increases complexity and leftover risk.
If you offer:
- unisex + women’s
You must split the inventory and you’ll need better data.
Best practice:
- default to unisex
- offer women’s as limited add-on with size selection required
- or collect sizes ahead of time
The “Oh No” Problems (And How to Prevent Them)
Problem: Running out of mediums and larges first
This is the most common scenario.
Fix: allocate more to M/L and slightly less to extremes unless you have data.
Problem: Too many 2XL and 3XL left over
Fix: don’t over-allocate extended sizes without knowing the crowd.
Problem: People want to swap sizes and you lose control
Fix: establish a simple policy:
- swaps allowed only while supplies last
- staff keeps a swap tally
- hold a small reserve of common sizes if it’s an included shirt event
A Simple “Order Worksheet” You Can Use Right Now
- Expected attendance: ______
- Shirt type: staff / included / merch / giveaway
- Participation rate: ______%
- Staff/VIP: ______
- Buffer: ______%
- Total quantity: ______
Then choose size breakdown and apply it.
Recommended Defaults (When You Need a Fast Answer)
If you’re truly stuck and need a reasonable starting point:
Optional merch sales default
- Attendance × 15%
staff
10% buffer
Moderate giveaway default
- Attendance × 20%
staff
10% buffer
Included shirt default (registration event)
- Registrations × 90% show rate
staff
8%–12% buffer
Final Thought: Better to Order Intentionally Than Perfectly
You’re never going to predict sizes perfectly without data. The goal is to:
- order enough to meet demand
- avoid major leftover piles
- keep sizing reasonable
- protect your budget